

Introduction
The following instructions explain how to set up your Snom phone with a Winet phone line. If you are using your phone in conjunction with a PBX system, please skip step 4.
Find the phone's IP address
The easiest way to set up the phone is using your web browser. To do this, you’ll need the phone’s IP address. You can find it as follows: There is a ( ?) button on your phone. Tap it, and then select the „IP Adr“ option on the display. The IP address will now be displayed. Write down the address and copy it into your browser’s address bar. After pressing Enter, you’ll see your phone’s web interface.
Snom 7xx: Here's how to view the IP address by following these steps:
- Menu button
- 5 -> Information
- 1 -> Status Information
Snom 300: Use the down arrow key to navigate here until you reach «Information,» then tap the checkmark button to display the IP address.
Update Firmware
To update the firmware on your Snom, please follow these steps:
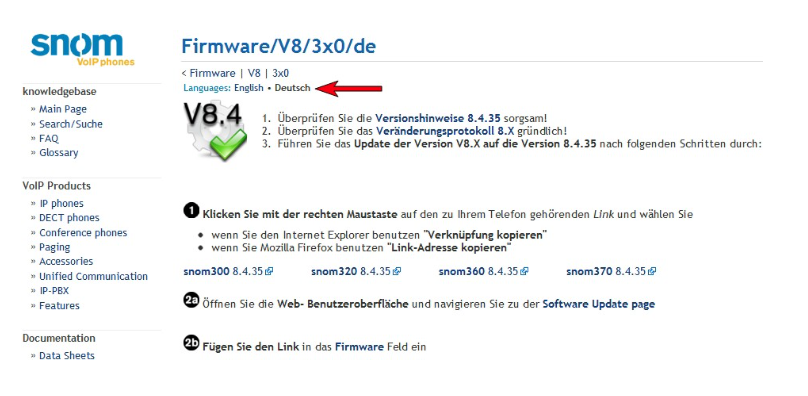
1. Go to http://wiki.snom.com/Firmware and select your phone.
2. Click on the desired firmware version
3. Select: “Manual Update to VX.x“
4. Please follow the instructions provided by Snom; you can switch the language from English to German at the top (red arrow).
Set Up Identity (myPhone)
Now go to „Identity 1“ on the page and enter the required information there (see screenshot). You can find the information you need at https://my.winet.ch by clicking on your phone number.
| Display Name | Your Name |
| User Identification | 0041xxxxxxxxx |
| Password | Password for Your Phone Number |
| Registrar | sip0x.winet.ch / sbc.winet.ch |
| Authorization Name | 0041xxxxxxxxx |
| Answering machine | 0041xxxxxxxxx |
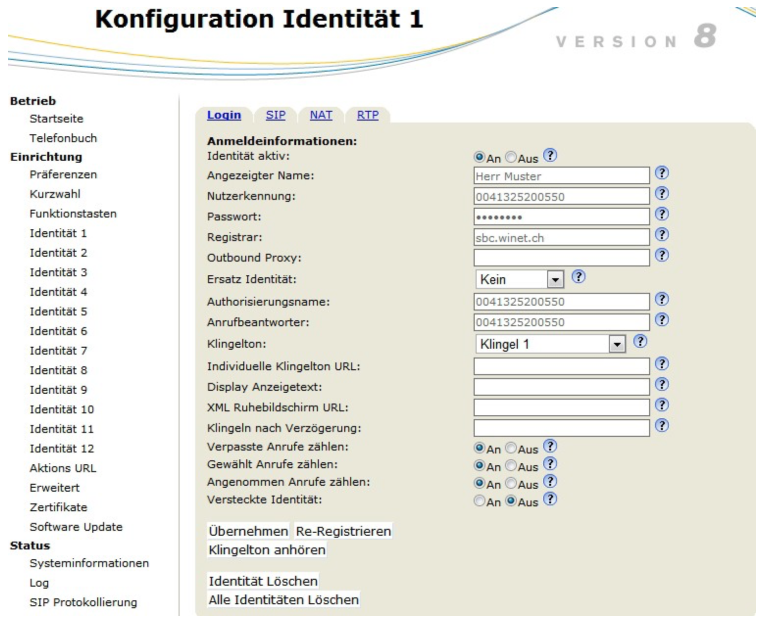
Attention: Don't forget to click on “Apply“ Click here after you've made changes.
SIP Tab
In this configuration step, you can leave the default values as they are.
NAT Tab
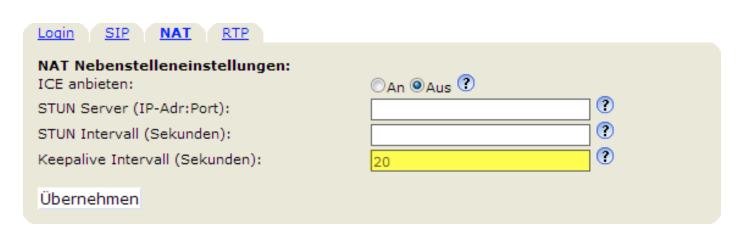
Enter the keepalive interval (20) here so that the phone stays connected to our servers at all times.
RTP Tab
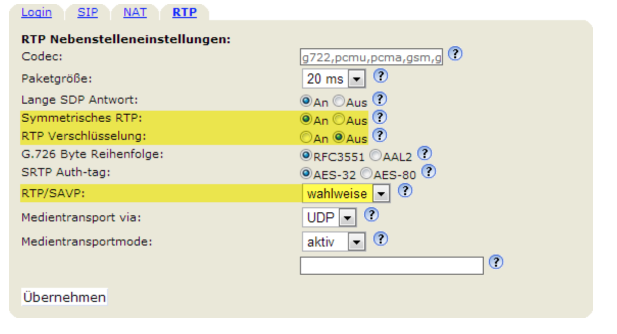
Make sure that RTP encryption is turned off. Also, enable «Symmetric RTP.» Set RTP/SAVP to «optional.».
Set Up Identity (voxGate/hostedPBX)
Now go to „Identity 1“ on the page and enter the required information there (see screenshot). You can find the required information on the voxGate when you switch to the desired extension.
| Display Name | Your Name |
| User Identification | Extension (e.g., 50) |
| Password | Your extension's password |
| Registrar | IP address of voxGate |
| Authorization Name | Extension (e.g., 50) |
| Answering machine | Extension (e.g., 50) |
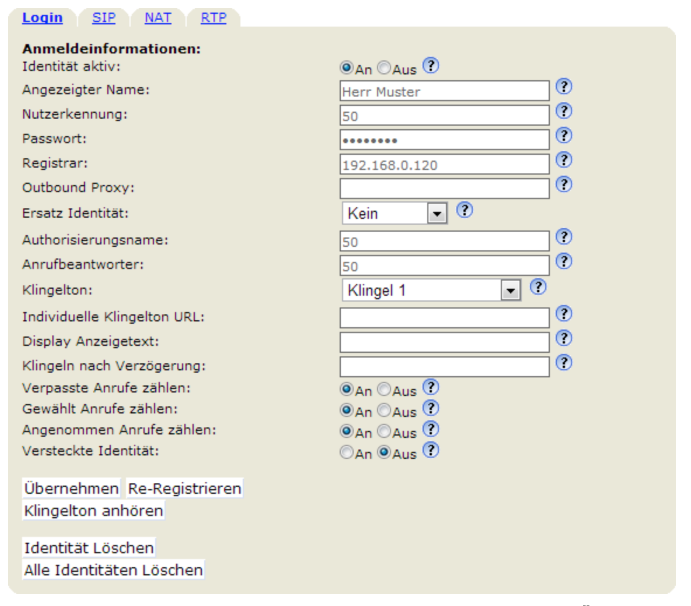
Note: Don't forget to click “Apply“ at the very bottom of each tab after you've made changes.
SIP Tab
In this configuration step, you can leave the default values as they are.
NAT Tab
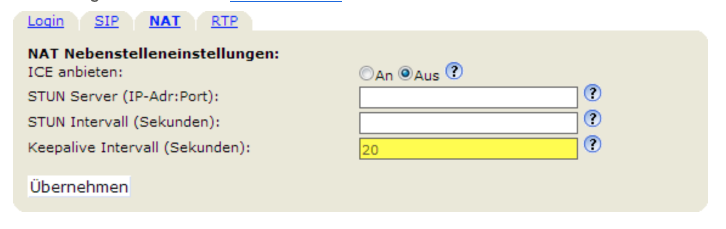
Set the keepalive interval to 20 seconds here so that the phone maintains its connection to the server.
RTP Tab
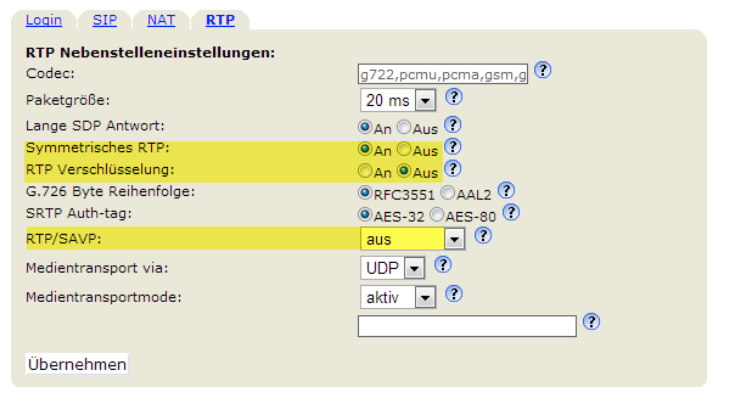
Make sure that RTP encryption is turned off. Also, enable «Symmetric RTP.» Turn off RTP/SAVP.
External Settings
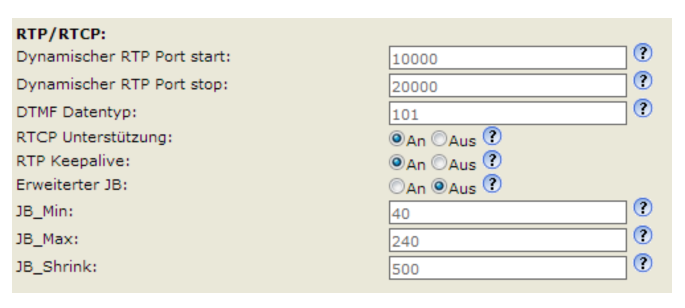
If you register your phone externally—for example, with your hostedPBX—there are a few settings that should be adjusted to ensure trouble-free calling.
On the left side, click «Advanced» and then the «SIP/RTP» tab. Scroll down to the «RTP/RTCP» settings and adjust the ports from 10,000 to 20,000.
Redirection at the push of a button
To set up call forwarding on your Snom phone with the push of a button, first go to «Function Keys» on the left side of the web interface under the «Setup» heading. If your Snom has older firmware (version 7) installed, the web interface will look like the screenshot below. To set up call forwarding here, select the desired key under “Key Event” and then enter “F_REDIRECT:0791112233” in the number field.
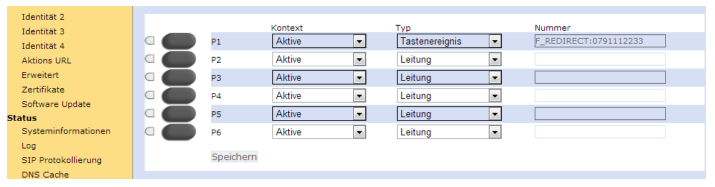
If new firmware (version 8) is installed, the web interface will appear in white and gray. To set up call forwarding to the desired button, select the type as «Forward to» and then enter the number in the number field.

You can now use the button you set up to turn call forwarding on or off at any time. Call forwarding is active when the light next to the button is on. Tap the button again to turn call forwarding off.
Customize Ringtone
There are two ways to customize the ringtone on a Snom phone: either through the web interface or directly on the phone's display.
Customize via the web interface
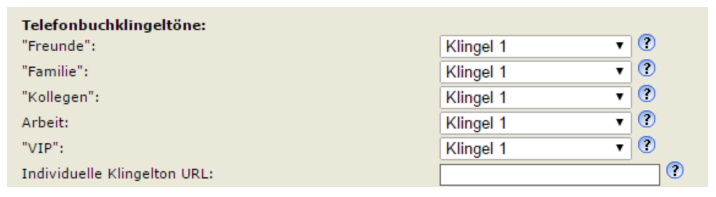
To customize the ringtone via the web interface, you must first access it . On the left side, click «Preferences.» Scroll down in the Website until you reach «Phone Book Ringtones.» Customize the ringtone here as desired.
Adjust via the phone's display
There are several ways to customize the ringtone using the phone's display, depending on the phone model:
Snom 320/360/370 / Snom 720/760
Menu button -> Preferences -> Ringtone -> Active number -> Select ringtone
Snom 300 / Snom 710/715
Settings -> Preferences -> Ringtone -> Active Number -> Select Ringtone.
Distinguish Between Internal and External Ring Tones (voxGate/hostedPBX)
You can distinguish between internal and external calls based on their ringtones. To do this, you need to adjust two settings: one on the phone system and one on the Snom phone.
Configuration for voxGate/hostedPBX
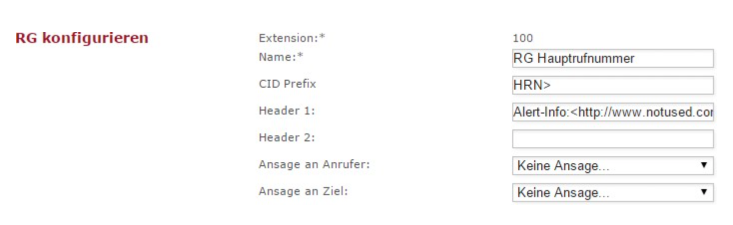
In the system, you can include a header with a ring group or queue. Enter the following path there:
«Alert Info:;info=alert-group;x-line-id=0».
Configuration on Snom
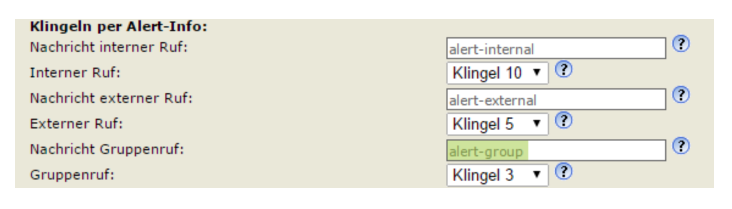
To configure the Snom, first go to the web interface of the respective phone. Under the «Preferences» section, scroll down to "Ring via Alert Info." The phone now needs the same information that was previously set up on the system.
Support Winet Voicetec Solutions AG
For support inquiries or technical assistance, our VoIP engineers are available to assist you during our business hours.
Service Period
Proactive, staffed operational support is available during business hours (AZ) on business days from Monday through Friday (excluding holidays) from 8:00 a.m. to 12:00 p.m. and from 1:30 p.m. to 5:00 p.m. During other times (OT), the optional on-call service is available.
Coordinates
You can contact our Customer Service as follows:
- Email service@winet.ch (to open a ticket)
- Residential Customers 0900 66 3932 (CHF 2.50/min)
- Business Customers +41 56 520 20 00