

Acrobits Groundwire
SoftPhone Configuration
Author: Sandro Coti / Jeffrey Schmid
Version: May 4, 2022
Introduction
This guide explains how to use the Groundwire app on your smartphone
Setting Up Groundwire hostedPBX on Android
SIP Channel
The first thing you'll see when you launch Groundwire is this menu. Tap the three dots in the upper-right corner and select «Add Account.» At the very top, you'll see "New SIP Account." Tap that as well.
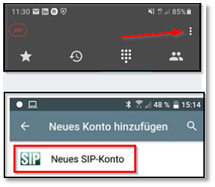
Setting Up a SIP Account on Android
SIP Account
Here you can see the configuration window. In the "Title" field, you can enter the name of your account, e.g., Test123 or whatever you like. In the "Username" field, enter the extension number defined on the hostedPBX. In the "Password" field, enter the password you set on the hostedPBX. The domain is the location where the client should register (hostedPBX). Here, you can enter the name of the PBX or its IP address. Both work exactly the same way. If you do not have this information, please contact your IT service provider or send us an email at customer.service@winet.ch. Please include in your email the name of the company you represent or your customer number, if available. Also include a callback number and the internal number you wish to register.
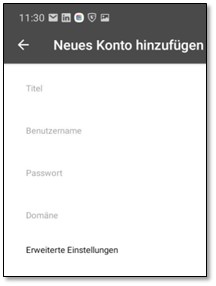
Advanced Settings
Tap "Advanced Settings" at the bottom. Here, you'll need to make several configurations. iOS and Android aren't exactly the same, but below is a list of the
the necessary configurations that need to be set.
Android
Under «Advanced Settings»
- Incoming Call → Default
- -Enable video calls → Off
- - WiFi codecs → Move G.711 u-law to disabled codecs; Priority 1: G.711 a-law; Priority 2: G.722
- -Codecs for 3G → Move G.711 u-law to disabled codecs; Priority 1: G.711 a-law; Priority 2: G.722 -Enable video calls → Off
- - Define authentication username = Enter «Participant/Internal,» e.g., 311 under "NAT Traversal"
- Force private IP → Off
- Keep-Alive Period → 20
Setting Up Groundwire hostedPBX on iOS
SIP Channel
The first thing you'll see when you launch Groundwire is this menu. Tap the gear icon in the upper-right corner and select "Accounts." Tap the "+" as shown below, and then tap "General SIP Account.".
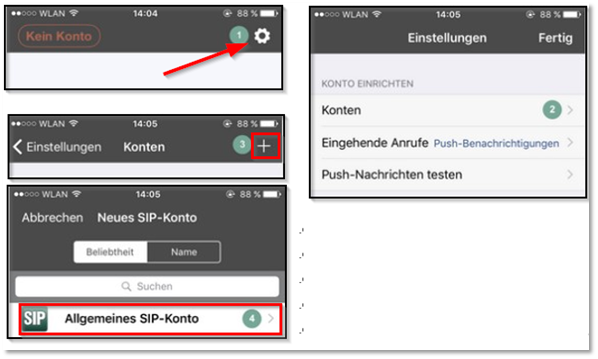
SIP Account
Here you can see the configuration window. In the "Title" field, you can enter the name of your account, for example, Test123 or whatever you like. In the "Username" field, enter the extension number defined on the hostedPBX. In the "Password" field, enter the password you set on the hostedPBX. The domain is the location where the client should register (hostedPBX). Here, you can enter the name of the system or the IP address. Both work exactly the same way. If you do not have this information, please contact your IT service provider or send us an email at customer.service@winet.ch. Please include in your email the name of the company you represent or your customer number, if available. Also include a callback number and the internal number you wish to register.
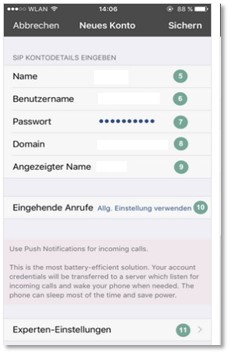
Advanced Settings Settings
Tap "Advanced Settings" at the bottom. Here, you'll need to make several configuration changes. iOS and Android aren't exactly the same, but below you'll find a list of the necessary configurations that need to be set.
IOS
Under «Advanced Settings»:
- WiFi codecs → Move G.711 u-law to disabled codecs; Priority 1: G.711 a-law, Priority 2: G.722
- Codecs for 3G → Move G.711 u-law to disabled codecs; Priority 1: G.711 a-law; Priority 2: G.722
- Enable video calls → Off
- Define username = Enter participant/internal, e.g., 311
Under «NAT Traversal»
- Force private IP → Off
- Keep-Alive Period → 20
Push Server
Enable Push Server
If you want to use the push service, you must send an email to Customer Service. The email reads: customer.service@winet.ch. Send us a short email—preferably including your customer number, the extension you've configured, and the type of cell phone you use (e.g., iPhone, Samsung, etc.)—and we'll activate the push service for you.
Important Information
Multiple Registrations
Not all hPBX systems support multiple registrations. The Ayrix hPBX supports multiple registrations starting with version 5.0.
If you're unsure whether you're eligible for multiple registrations, feel free to contact us at any time at customer.service@winet.ch Contact us.
Ad Format
This is a phone setting, not a setting within the app itself. Every phone has its own settings for this. There are also differences among Android models. While a Samsung and a Xiaomi are similar, they aren't exactly the same. You'll have to figure out for yourself how it works on your phone.
Support Winet Voicetec Solutions AG
For support inquiries or technical assistance, our VoIP engineers are available to assist you during our business hours.
Service Period
Proactive, staffed operational support is available during business hours (AZ) on business days from Monday through Friday (excluding holidays) from 8:00 a.m. to 12:00 p.m. and from 1:30 p.m. to 5:00 p.m. During other times (OT), the optional on-call service is available.
Coordinates
You can contact our Customer Service as follows:
- Email service@winet.ch (to open a ticket)
- Residential Customers 0900 66 3932 (CHF 2.50/min)
- Business Customers +41 56 520 20 00