


- Important instructions
- Abbreviations used, spellings
- Positioning and setting up the telephone
- Get to know your phone
- Telephone books
- The operation of the telephone
Important instructions #
Please read the safety instructions and operating instructions before using the device. Let other users of the device read them or inform them of their content. Keep these operating instructions and only pass the phone on to third parties with the operating instructions.
security #
Follow the instructions in these operating instructions and in the other documentation for the device.
- If the power supply is not provided via an Ethernet cable, only use a power supply unit expressly recommended by Snom. Using other power adapters could damage or even destroy the phone.
- Avoid placing the phone cables in such a way that people could trip over them. Avoid laying the cables in such a way that they could be exposed to mechanical pressure and thereby damaged. If the power cord or plug is damaged, disconnect the product from the power supply and contact qualified service personnel.
- This device is only intended for indoor use!
- Do not place the phone in rooms with high humidity such as bathrooms, laundry rooms, and damp basements. Do not immerse the phone in water or pour liquids on or into the device.
- Do not set up the phone in areas where there is a risk of explosion (e.g. paint shops). Do not use the phone if you smell gas or other potentially explosive fumes.
- Do not make calls during a thunderstorm (risk of electric shock if lightning strikes the network).
- Warning: The handset contains a magnet and can attract small dangerous objects such as needles, so before holding it to your ear, make sure nothing is stuck to it.
SELV (Safety Extra Low Voltage) compliance #
The input / output connections comply with the SELV guidelines for low voltage devices.
Warning: To avoid electric shock, do not connect SELV devices to devices that carry mains voltage (TNV). Connect to LAN ports only! LAN ports contain SELV circuits, whereas landline connections contain TNV circuits. Be careful when connecting, as both connectors could use RJ-45 (8P8C).
Conformity to standards #
This device complies with the fundamental health, safety and environmental requirements of all relevant European directives.
This device is FCC tested and complies with the applicable US guidelines.
The declaration of conformity can be requested from:
Snom Technology GmbH Wittestr. 30 G
13509 Berlin, Germany
Unauthorized opening of the device as well as changes and modifications to the device lead to the expiry of the warranty and can also lead to the expiry of the approvals. In the event of malfunctions or defects, contact authorized service personnel, your salesperson or Snom.
Technical specifications #
- Security: IEC 60950
- Certificate: FCC Class B
- CE marking
- Power supply: Via network (Power over Ethernet (PoE)); if PoE is not available, use the Snom A6 power supply unit (not included), Phihong model PSM10R-050, which is available separately: Snom item no. 00004325 (EU clip)
- Ethernet: 2 x IEEE 802.3 / 1 Gigabit switch
- Power over Ethernet (PoE): IEEE 802.3af, class 2
- Connections:
- 2 x RJ 45 (Ethernet): 1 x LAN, 1 x PC
- 2 x 4P4C (handset, optional corded headset)
- USB port: D765 1x type A, US 2.0; Snom 760 2x type A, US 2.0
- 1 proprietary Snom socket for EHS Advanced
- Wireless audio transmission (D765 only): Compatible with Bluetooth V4.0 + EDR, class 2
Disposal of the product #
This device is subject to the European Directive 2012/19 / EU and must not be disposed of with household waste.
The separate collection and proper disposal of electrical and electronic equipment serve to avoid possible damage to the environment and human health as well as the prudent and rational use and reuse of resources
If you do not know where you can dispose of your old device, please contact your municipality, your local waste disposal company or your specialist dealer.
cleaning #
Use an anti-static cloth. Do not use water or cleaning liquids as they could damage the surface and the electronics of the device.
Abbreviations used, spellings #
In this manual you will see information like the following:


Example 2: Telephone web interface> Advanced> Behavior> Telephone behavior> Number completion> "On"
| Web interface | Open the phone's web interface |
| > Extended " | In the menu on the left of the window click on the entry "Advanced" |
| > Behavior | Then click the Behavior tab. The bold font on the title of a tab indicates that the contents of this tab are currently visible. |
| > Telephone behavior | Find the Phone Behavior section |
| > Number completion | Look for the entry "Number Completion" |
| > "On" | Click on the radio button |
Positioning and setting up the telephone #
scope of delivery #
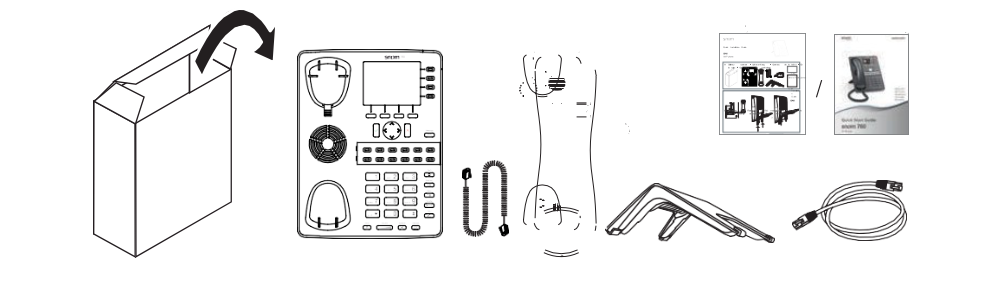
- Telephone set
- Plastic foot
- Listener
- Handset cord
- Ethernet cable
- Quick Start Guide (Snom 760) or Quick Installation Guide (D765)
Lineup #
Attachment of foot and receiver #
You can choose a tilt of 46 ° or 28 ° when setting up the phone.
Note: Before you attach the foot to the case, connect the long end of the handset cord to the“Marked socket on the back of the phone and insert the handset cord into the recess in the lower right corner.

- Position the grooves in the foot below the mounting rails on the back of the phone. For the steeper installation angle you have to push the short legs, for the flatter installation angle the long legs onto the brackets.
2. Slide the foot up onto the retaining rails until it clicks into place.
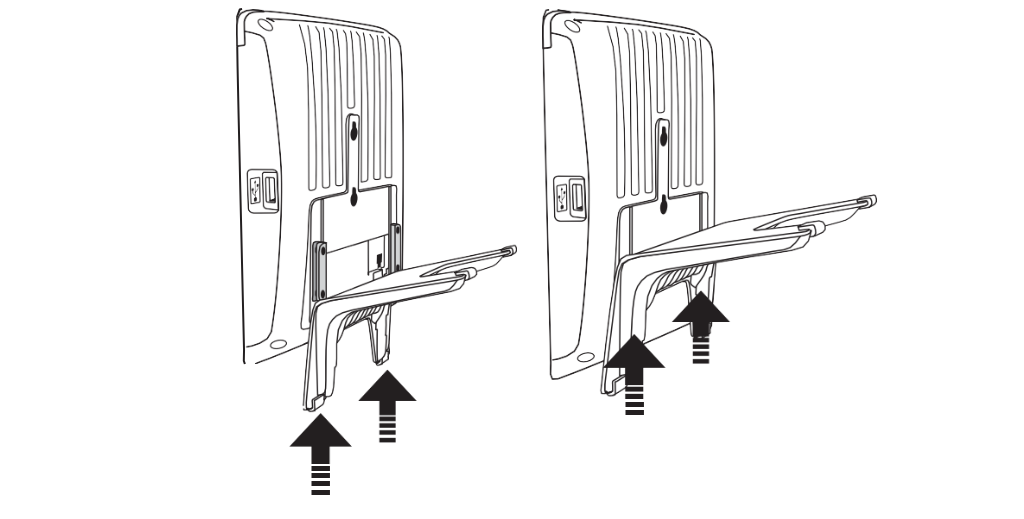
- Then connect the short end of the handset cord to the handset.
- Place the phone on a flat, horizontal surface.
Turn the earpiece over #
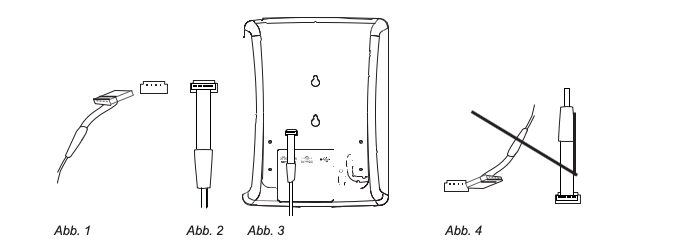
The phone is delivered with the handset pin in the position for placing the phone on a table. If the phone is going to be hung on the wall, we recommend that you turn the mandrel over.
The opening on the underside of the receiver fits exactly onto the tip of the mandrel, which then protrudes somewhat over the edge of the storage recess, and also holds the receiver securely in the vertical position.

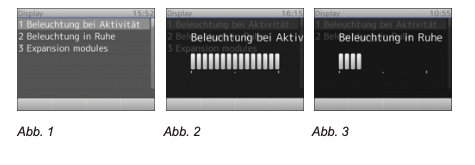
- Push the handset pin up and out of the slot (Fig. 1)
- Rotate it 180 °.
- Push it back into the slot (Fig. 2). The tip of the mandrel now protrudes about one millimeter over the edge (Fig. 3). There is a rectangular recess on the underside of the handset loudspeaker that is hooked onto the handset spike.
The instructions for wall mounting can be found in "Appendix 4 - Wall Mounting" on page 94 .
Connect the phone #
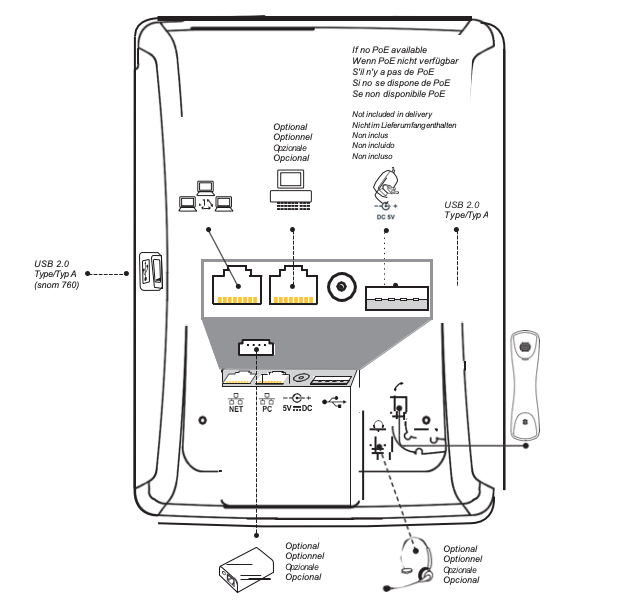
- Connect the Ethernet cable to the RJ45 connection socket labeled "NET". Connect the other end of the cable to your network to enable data exchange and to supply the phone with power if PoE is available.
If Power-over-Ethernet (PoE) is not available, use the Snom power supply unit A6 (not included in the scope of delivery). Insert the plug of the power supply unit into the with5V DC labeled socket and connect the power pack to the power supply.
Note: Use only a power supply unit expressly recommended by Snom. Using other power adapters could damage or even destroy the phone or cause annoying noises.
- The second RJ45 connection socket labeled “PC” on the underside of the telephone is used to chain other network devices together without the need for a second network connection.
Connect the headset
You can use both corded and cordless headsets.
- Corded headset.
If you want to use a headset, connect it to the " “Labeled audio jack on the back of the phone.
Note: If both a corded and cordless headset are connected to the phone, incoming calls will be directed to the cordless headset.
- Cordless headsets.
- D765. Connect a Bluetooth headset via the integrated wireless module: See Appendix 6 on page102.
- Snom 760. Connect a bluetooth headset using a bluetooth adapter: You need a bluetooth adapter to use a bluetooth compatible headset with the phone.
Plug the Bluetooth adapter into one of the two USB ports on the phone. Further information can be found in the Quick Start Guides for the Snom USB BT and the Snom HS BT or in the operating instructions for the headset from another manufacturer.
Danger: As of firmware version 8.7.2.11, the parameters of the sound card of the Snom HS BT are the default settings for USB headsets.
If your phone works with an earlier version, you have to set the parameters manually on the phone's web interface on the Advanced> Audio page in the text field of
Enter "Audio Parameter". Click the question mark to look it up.
to set the parameters
If you use a different cordless headset, you have to enter the parameters of the sound card manually on the web interface of the phone on the page Advanced> Audio in the text field of "Audio parameters" for all firmware versions.
Click the question mark to look it up.
to set the parameters for your particular headset
- Connection to the base of the headset via a Snom EHS adapter (not included).
Insert the plug of the 7xx adapter cable into the socket on the back of the phone as shown in Fig. 1, 2 and 3 below. Do not insert the plug upside down into the socket (Fig. 49); this would render the phone inoperable.
Note: To access the socket, you need to remove the base of the phone (see “Fastening the foot and receiver” on page 14). After you have connected the 7xx adapter cable, make sure that the cable lies flat on the base of the phone while you secure the stand. Twisting or compressing the cable can potentially damage the sheath of the cable or the wires inside.
For more information on connecting Snom EHS Advanced and your cordless headset, please refer to the Quick Start Guide for the Snom EHS Advanced and the operating instructions for your headset.
Initialization and registration #
requirements #
To use VoIP you need:
- A broadband internet connection.
- Access to the Internet through a router. This can be a separate device, as it is offered in various versions and by many different manufacturers, or a router on a server or PC.
- The access data received from your network administrator or your VoIP provider for the registration and use of your account. You can use up to 12 VoIP accounts with one or more VoIP providers. The required and optional data differ from VoIP provider to VoIP provider.
The registration and access data that you have received from your network administrator or your VoIP provider can vary and contain both required and optional data. The data required usually includes:
- Account (usually the phone number). At Snom, accounts are called “identities”.
- Registrar
- Password / Password
In addition, user name, authentication name, outbound proxy, answering machine account (if available) may also be required. These settings are made after the initial registration on the phone's web interface. For more information, see “Identities (Accounts)” on page 70.
initialization #
Snom telephones are plug and play. Once you have connected the phone to the network, the phone will start initializing.
Note: In most cases, your phone will initialize automatically. If the phone does not detect a DHCP server in the subnet, you will be asked: Are you using DHCP? If your network does not support DHCP, press and enter the IP address, the IP gateway and the DNS server manually. Ask your VoIP provider or your network administrator about this.
When prompted on the display, make your selection with and save it with.
You will be asked to select a language in English. Select with if necessary. another language and press to save the selected language.
- You will then be asked to select a time zone in the selected language. Use the time zone to set the time shown on the display.
Press the function key below to move to the beginning of the next time zone.
Use to move one entry up or down in the list.
Press the function key below in order to only have the time zones available in which the set telephone language is spoken.
Press the function key below to have all time zones available.
Press to save the highlighted time zone.
- Next, you will be asked to select the ringtone. This defines the dial tone that you hear when you lift the handset to dial, as there are different dial tones in many countries.
Press to move the highlight bar one entry up or down in the list.
- You will then see the “Welcome” screen. Press any key to register the first account.
Enter the account number and save it with.
Note: See also “Entering text, numbers and special characters” on page 26.
Enter the registrar and press.
If you are prompted to do so, enter the password received from your VoIP provider or your network administrator and press.
Do not press any buttons during the registration and initialization process, which may take a few minutes. If the registration was successful, you will see a green box with a handset symbol and the account (the identity) in the identity line under the line with the date and time:

Note: When you see the account on the display followed by one of these symbols /
/
and you do not get a dial tone, it is possible that the server cannot be reached due to service work or a malfunction. As soon as the server can be reached again, registration and initialization are automatically continued and terminated. Contact your administrator or your VoIP provider if this does not happen within a normal time frame
What to do if initialization and registration did not take place #
Contact your network administrator if the telephone is operated or is to be operated in a network.
If you use the services of a VoIP provider, you may have to enter additional data received from your provider that the phone does not ask for during initialization and registration. You enter this data on the phone's web interface.
Open the web interface of your phone - see. Open the Configuration Identity 1 page and enter the additional login data that you received from your provider. See also “Requirements” on page18 and “Edit identity / account” on page 72.
Note: Some IP telephony providers and / or SIP telephone systems require other settings than those preset in the Snom telephones in the delivery state. On Snom's website you will find a large number of SIP providers and telephone systems that have been tested for interoperability with our telephones and required changes in attitudes. Do not change the default settings unless you know exactly what you are doing. If necessary, consult an expert.
Correct the time #
The phone gets the time and date from your NTP time server. If your phone shows the wrong time, you should first check whether the correct time zone has been set (see).
- Setting the time zone: see "Time Zone" on page 75.
If the correct time zone is set and the time is still wrong, the problem may be with the time server, in which case please contact your administrator or your VoIP provider.
Preset display formats:
- time. 24-hour clock, e.g. 17:35. To change to 12-hour format: See "Date and time formats", section “Date” on page 74.
- date. US date format MM / DD / YEAR, e.g. 11/23/2010. Change to the European format dd.mm.year (e.g. 23.11.2010): See "Date and time formats", section “Time” on page 74.
Get to know your phone #
At a glance #
The presettings at a glance:
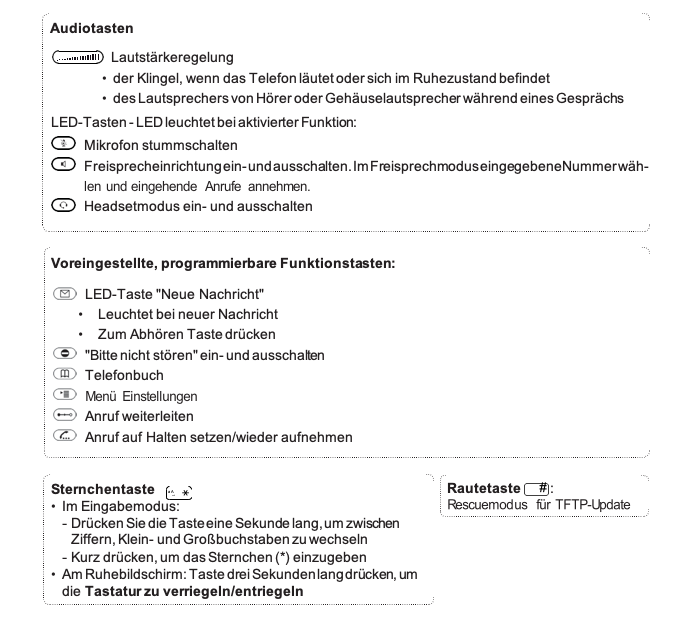
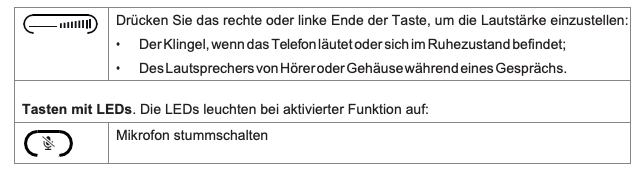
LED indicators #
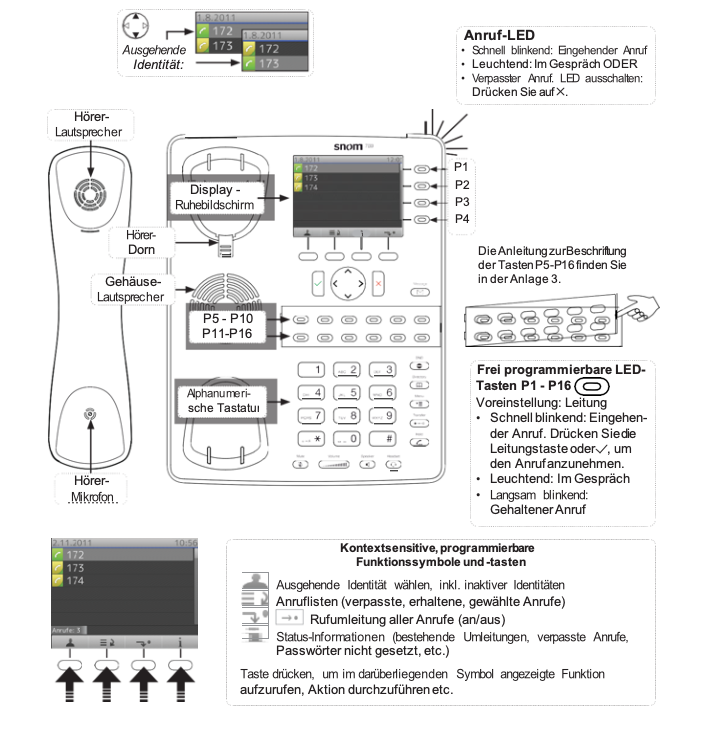
Call LEDs #
The glowing red LEDs in the top right corner of the phone indicate incoming calls, calls in progress, calls on hold, and missed calls. The LEDs:
- flash quickly when a call is ringing;
- light up continuously when you lift the handset, when you are on a call and when you have missed a call;
- flash slowly when you put a call on hold.
Function key LEDs #
Depending on the function with which the keys are assigned, the red or green LEDs embedded in the keys are activated when the key event occurs. The default setting is red LED and “line”. Line button LEDs:
- flash quickly when a call is ringing;
- light up continuously when you are dialing or talking;
- blink slowly when a call is on hold;
- are off when the line is free.
If the buttons are assigned other functions, the LEDs may flash or light up. Please refer "Programming the function keys" on page 64. Example: Assignment with the "Extension" function. The LEDs:
- flash quickly when the extension is ringing an incoming call;
- light up continuously when the extension is busy;
- are off when the line is free.
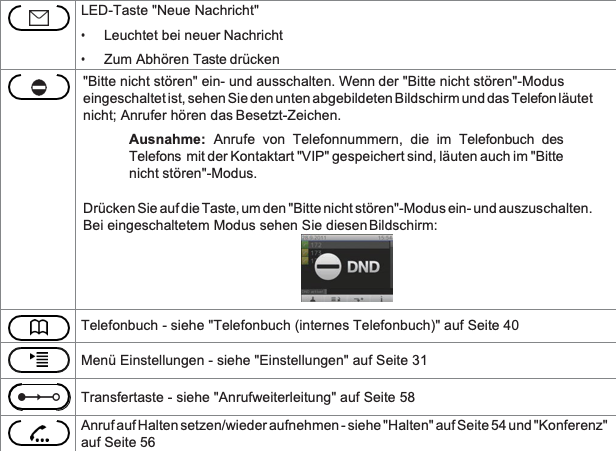
"New Message" LED button #
Lights up red when there are new messages waiting in the mailbox.
Housing buttons #
Freely programmable keys with LEDs #
These are the freely programmable keys P1 - P16, which you can program on the phone's web interface on the "Function keys" page. More information about programming can be found in the chapter "Programming the function keys" on page 64. The default setting is "Line". See also “At a glance” on page 21.
Context-sensitive, programmable function keys #
These function keys can be assigned with the key events available in the pull-down menu for the idle state on the web interface of the telephone on the "Function keys" page. Further information on programming can be found in the chapter "The programming of the Function keys "on page 64. Preferences see “At a glance” on page 21.
You cannot set which functions are available when the phone is active
ie when you are on a call, when a call is ringing, etc. These are different functions depending on the activity of the telephone.
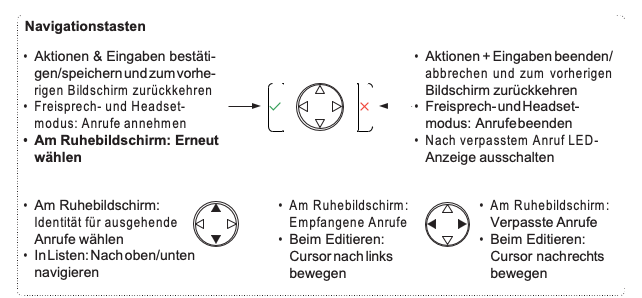
Navigation key, confirm key, cancel key #
can be assigned the key events available in their pull-down menus, which are then available when the phone is idle. More information about
the programming can be found in the chapter "Programming the function keys" on page 64. The following functions are preset. Briefly press the respective button to trigger it.
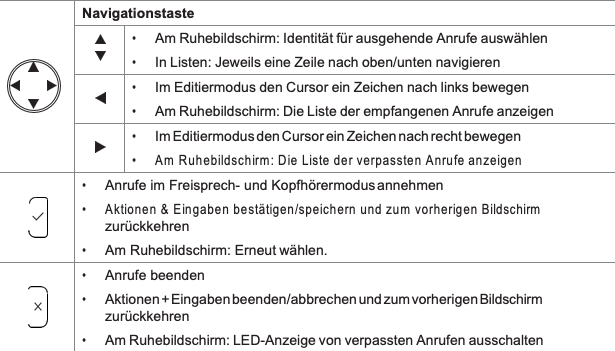
Preset, programmable function keys #
The default setting is the key event printed on the housing in English. The keys can be assigned other key events and a number of other functionalities.
More information about programming can be found in the chapter “Programming the function keys” on page 64. The following functions are preset. Briefly press the respective button to trigger it.
Audio buttons #

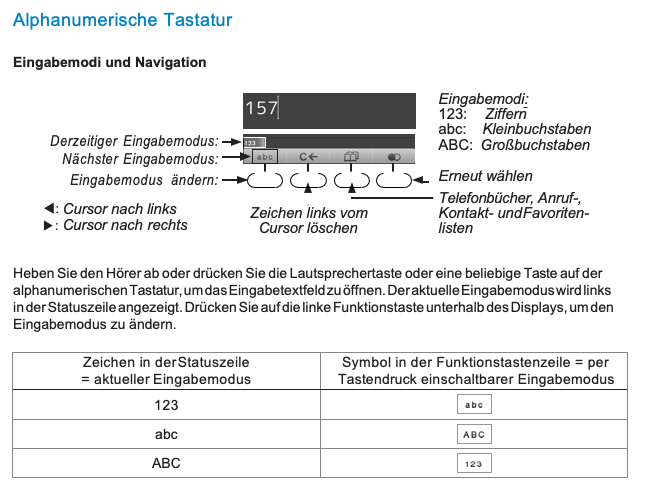
Entry of text, numbers and special characters #
After entering letters, umlauts and special characters, wait until the cursor has jumped to avoid overwriting the character you just entered. This is not necessary in the number input mode.
Digits. In numeric entry mode, press the appropriate numeric key to enter the number printed on it.
Letters. In the uppercase and lowercase input modes, press the respective key one to three or four times to enter the first, third or fourth letters printed on the key.
Example: In lower case entry mode, press the “2” key once to enter an “a”, twice to enter the “b”, and three times to enter the “c”.
Umlauts and accented letters
Umlauts and letters with accents are entered in the input modes lower and upper case letters on the keys “2” to “9”. The characters available depend on the set telephone language. Press the key on which the basic form of the respective letter is printed until the desired umlaut or accented letter appears.
Example: If the telephone language is German, press the “2” key four times in the lower case letter mode to enter the lowercase “ä” (4x key “6” = “ö”, 4x key “8” = “ü”). Press the same keys four times in uppercase mode to enter “Ä”, “Ö” or “Ü”.
Special characters and symbols
Enter lowercase and uppercase letters on the "0" and "1" keys in the input modes. Press the key briefly and wait after each character until the cursor has moved on.
Key "0":
- Press the key once to enter the space (“˽”).
- Press the key twice to enter the underscore ("_").
Key "1":
Press the key as often as indicated in the table to enter the respective character. Example: Press “1” once to enter the period (“.”).
Layout of the display #
Hibernation #
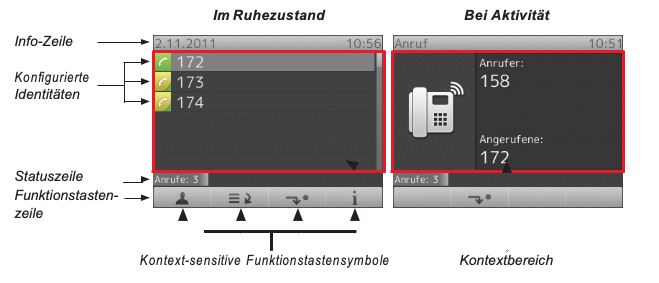
In idle status you will find the following information on the display:
Info line: Date and time.
Context area: The configured identities.
For more information on configuring new identities and editing existing identities, see section “Identities (Accounts)” on page 70.
Status line
This line can contain one of many messages about the current status of the phone, e.g. when there is a new firmware version, a restart is required, etc. If there are several messages at a time, the one with the highest priority is shown. The list of possible messages in descending priority can be found in the "Appendix 2 - Status Messages" on page 92.
Some of the status messages you might see:
- The texts "Divert on busy" and "Divert on no answer", followed by the phone number to which incoming calls are diverted if the phone is busy or the call is not answered within a certain period of time.
- The word “Calls:” followed by a number notifies you that and how many missed calls have been received since you last displayed the “missed calls” indicator.
- The warnings “No HTTP password!”, “No administrator password!”. You can switch it off by setting the password or manually.
- Turn off status messages
- Messages are automatically deleted when the reason for the message no longer exists, that is, when the security problem has been fixed, the redirect has been removed, the system has been restarted.
Manual: Press if the key is offered or press
> 6 information
| Delete |
> 1 Status info to open the “Status info” screen. Use / to select the to
delete entry and press /.
Function key line
The key symbols in this line symbolize the functions that can be called up by pressing the function key directly below the symbol. The list of available symbols and their explanations can be found in the appendix. The default settings are:
| | screen Outgoing identity: Displays the URIs of all configured identities. | |
| | Call lists (missed, received and dialed calls) | |
| | | Forwarding of all calls (activate / deactivate) |
![]() When the phone is active #
When the phone is active #
The display shows you what activity the phone is currently doing. This information is represented in the form of text or symbols or both.
Info line. Left: name of the activity; right: time
Context area: Depending on the activity, this area contains symbols (ringing incoming or outgoing call, in conversation, etc.) and text such as the calling or called number, the numbers of the conference participants, etc.
Status line
If an editable window is open, e.g. when dialing or editing phone book entries, the current input mode (ie digits, lowercase letters or uppercase letters) is shown in front of the status message, if a status message is available.
Function key line
Depending on the activity of the phone, you will see different symbols in the function key line. The functions they represent are activated by pressing the function key directly below the respective symbol. The list of symbols can be found in the "Attachment 1 - Display symbols ”on page 88.
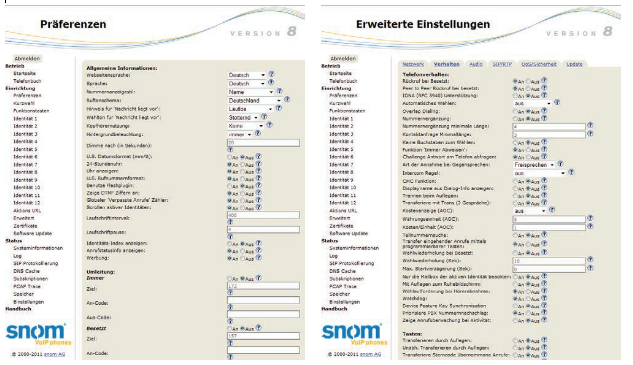
Settings #
A comparatively small number of settings can be made on the phone; many more are possible on the phone's web interface. For more information see "Settings customize ”on page 70.
Make settings on the phone #
Press the button to bring up the settings menu on the display. To open a submenu or setting, press its on the alphanumeric keypad
The submenus and settings with a black + gray background are not available in user mode. The default is administrator mode; the factory-set administrator password is 0000 (4x zero). For more information on the administrator and user modes, see the section “User and Administrator Modes” on page 38.
Danger: The phone is in administrator mode and the maintenance menu is up
on the display, switch to user mode by pressing the ABC 2 key.
If the phone is in user mode and the maintenance menu is on the
Display, switch to administrator mode by pressing the ABC 2 key. To
however, you must enter the administrator password. The factory-set administrator password is 0000 (4x zero).
Most of the settings are described in other chapters of this manual: See "Using the Telephone" on page 48 and "Customize settings" on page 70.
Set the display lighting #
The lighting of the telephone display and the connected expansion modules can be set separately for times of telephone activity and for times of inactivity. By reducing the luminosity, you reduce the power consumption of the devices.
The display lighting for sleep mode can be completely switched off by reducing the light intensity to a vertical bar. The phone switches the display backlight to idle mode if the phone has been inactive for a specified number of seconds
recorded. You can set the number of seconds until the idle light is switched on on the phone's web interface.
Telephone display lighting
- Luminosity.
- Press
.
- Press 1 Preferences.
- Press 5 Display.
- Press 1 light when active or 2 light when idle.
Press the right or left arrow on the navigator to increase () or decrease () the backlight.
- When you're done, press
to save the setting and return to the display menu (Fig. 1).
- Setting the number of seconds:
- Open the phone's web interface (see "Open the phone's web interface" on page 36).
- Click on "Preferences" (see "How the phone's web interface works" on Page 37).
- Enter the number of seconds in the text field of "Dim after (in seconds)" in the "General information" section. The default is 20 seconds.
- Click on "Apply" and "Save".
Display settings of the connected expansion modules
The brightness of the background lighting of the displays can be set separately for the display on the telephone and the displays of the connected expansion modules, both for times of telephone activity and for times of inactivity. By reducing the luminosity, you reduce the power consumption of the devices.
Note: The number of seconds of telephone inactivity after which the expansion modules switch to "Illumination in idle" mode is the one that has been configured for the telephone's backlight (see "Setting the number of seconds" in the previous section "Illumination of the telephone display" on page page 33).
- Luminosity.
- Press
.
- Press 1 Preferences.
- Press 5 Display.
- Press 3 Expansion Modules.
- Press 2 lights when active or 3 lights when idle.
Press the right or left arrow on the navigator to increase () or decrease () the backlight.
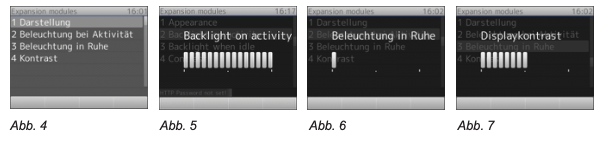
- Set the appearance of the names / information on the display (tiles or lines; further information can be found in the D7 operating instructions in the section "Display layout").
- Press
.
- Press 1 Preferences.
- Press 5 Display.
- Press 3 Expansion Modules.
- Press 1 Presentation.
- Press 1, 2 and / or 3 to change the display of the first, second or third expansion module from lines to tiles or vice versa and save at the same time.
- When you have made all the settings, press
to return to the Expansion modules menu (Fig. 4).
- Press 4 Contrast.
Press the right or left arrow on the navigator to increase () or decrease () the contrast.
- Press
to save the settings and return to the Expansion modules menu (Fig. 4).
The phone's web interface #
Open the phone's web interface: See page 36.
Firmware versions up to 8.7.3 x
When you open the web interface for the first time after initializing and registering the first account, you will see the "Security" page.
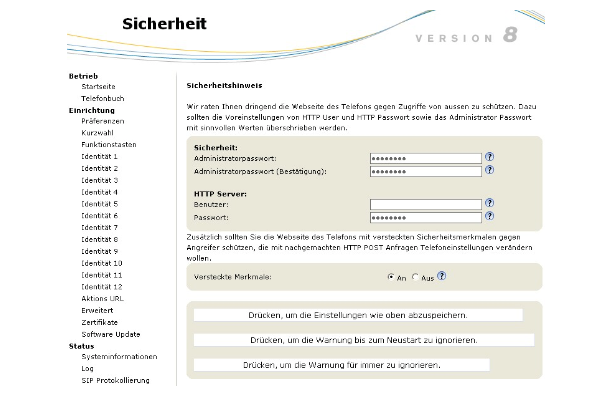
We recommend that you set your own administrator and HTTP passwords. The default administrator password is 0000 (4 x zero); there is no default HTTP password.
Hints:
- Without your own administrator password, it can happen that an unauthorized third party sets an administrator password and you can then no longer switch to administrator mode.
- If you don't set an HTTP password, you make it easier for savvy hackers to break into your system.
- If you set your own passwords, write them down and keep them in a safe place.
Without the administrator password, you cannot switch the phone from user to administrator status, ie you have no access to many settings.
You cannot open the phone's web interface without an HTTP password.
If you do not want to set an HTTP password, you can switch off the warning in the display until the next restart or permanently by clicking the corresponding button
click. If you later change your mind and want to set an HTTP password, you can do so on the web interface of your phone on the Advanced page> “QoS Security” tab>
Catch up on the “HTTP Server” section or switch off the warning via Advanced> QoS Security> Security> Ignore Security Instructions> On> “Apply” + “Save”.
Firmware versions from 8.7.4
If you register your first account while initializing the phone, your SIP user name and password will be saved as the HTTP user name and password at the same time.
You can change it afterwards or later in the phone's web interface> Advanced> QoS / Security> HTTP Server. The default administrator password is 0000 (4 x zero).
Hints:
- We recommend setting your own administrator password. Without your own administrator password, it is possible that an unauthorized third party sets an administrator password and you can then no longer switch to administrator mode.
- If you set your own passwords, write them down and keep them in a safe place.
Without the administrator password, you cannot switch the phone from user to administrator status, ie you have no access to many settings.
You cannot open the phone's web interface without an HTTP password.
Open the phone's web interface #
Find out the phone's IP address: Press> 6 Information> 2 System Info.
- Open a browser on your PC. Enter "http: //" followed by the phone's IP address, e.g. http://192.168.10.115, and press the ENTER button. The start page opens:
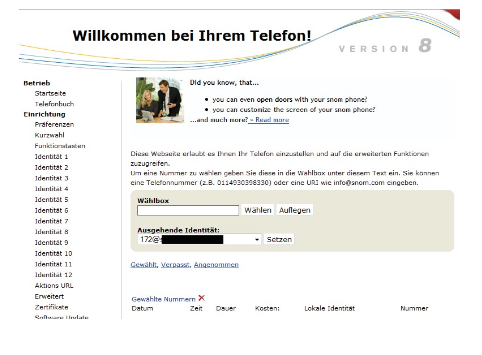
How the phone's web interface works #
The menu on the left side of the window always looks the same, no matter which window is currently open. The menu items displayed depend on whether the phone is in user or administrator mode.
Click on a menu item to open the associated window. Some windows contain multiple documents with tabs at the top. To make a document visible, click on the tab. The font style of the text characters is on the visible tab fat. Only one tab can be displayed at a time.
Note: Please remember to always click on "Apply" and "Save" before closing the phone browser or clicking on another menu item if the changes you have made are to take effect.
After you have clicked on "Apply", the "Save" button appears at the top of the page. Click it to permanently save the changes. In the event of a power failure or if the phone is disconnected from its power supply, the unsaved settings will be lost.
To the right of each setting is a link, which is represented by a question mark in a circle. Click on this link to open a wiki page with information on the respective setting (description, valid values, default setting, links to related topics, etc.). Click the browser's back button to return to the phone's web interface.
Note: You may have to re-enter the HTTP password to return to the phone's web interface.
Settings on the web interface have priority over manual settings on the phone
In some cases, settings made on the web interface take precedence over settings made on the phone. If a setting you have made on the phone does not seem to work, please check the web interface to see if there is an opposite setting.
User and administrator mode #
Snom telephones can be operated in user and administrator mode. In administrator mode, the phone user can access all settings and change them at will; in user mode the user does not have access to a number of settings. The default is administrator mode.
Note: If your phone is managed centrally (by your network administrator or VoIP provider), User mode may be preset.
To switch to administrator mode in user mode, you need the administrator password. The preset administrator password is 0000 (4 x zero).
We recommend setting your own administrator password. Without your own administrator password, it can happen that an unauthorized third party sets an administrator password and you can then no longer switch to administrator mode.
If you set your own password, write it down and keep it in a safe place. Without the administrator password, you cannot switch the phone from user to administrator status, ie you have no access to many settings. You'd have to be in this
User mode on the phone #
The “3 Identity” and “4 Network” menus and the “4 Reset values” setting in the “Maintenance” menu cannot be accessed.
User mode on the web interface #
In user mode, some windows, such as the one shown here, “Preferences”, are displayed, but others are not. The menu item “Advanced” is also available in user mode, but the normal page content is not displayed:
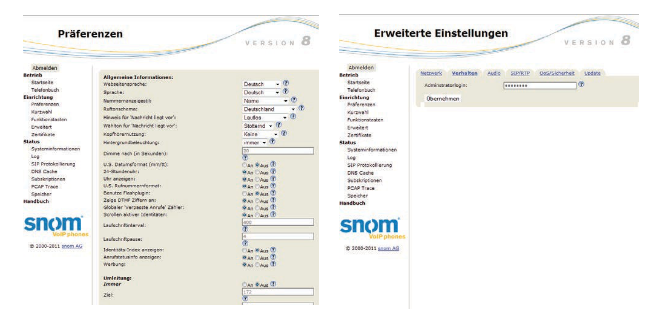
To activate the administrator mode in the phone and on the web interface, enter the administrator password in the administrator login text field and click on "Save". The default password is 0000 (4 x zero). The Preferences and Advanced Settings pages in Administrator mode:
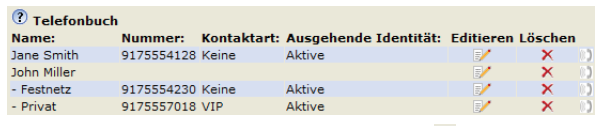
Telephone books #
Telephone book (internal telephone book) #
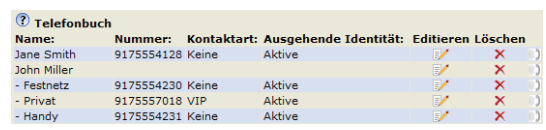
The internal phone book can hold 1000 entries. The entries can be added and changed both on the phone and on the web interface.
Changes to the web interface do not take effect until you click "Apply" and "Save". Changes are not saved if you switch to another window in the web interface or if you close the web interface without clicking "Apply" and "Save" .
Definitions, explanations #
Entries #
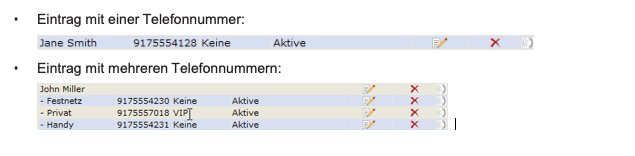
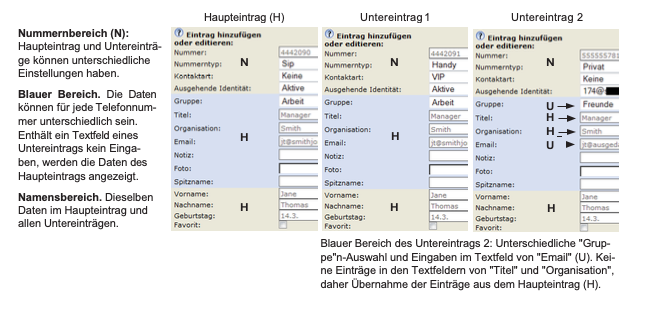
Each entry must have at least one phone number; several numbers per entry are possible. If several numbers are assigned to a name, the entries in the name area are the same; in the blue area and in the number area they can be different.
If you do not enter a first name and / or surname and / or nickname, the telephone number will appear in both the “Number” and “Name” rubric.
Contact types #
VIP: Calls from telephone numbers assigned to this type of contact will ring even if the ringer is switched off by activating the idle function. You can assign a specific ringtone to the contact type VIP. If your VIP belongs to a group (see below) that is also assigned a ringtone, the group's ringtone will sound!
Reject List: Calls from phone numbers on this list will not ring. The caller hears the busy signal.
Identity for outgoing calls #
The default setting is "Active", ie the phone uses the current outgoing identity for outgoing calls to the number of the phone book entry.
You can set a specific configured identity from the pull-down menu, e.g. if a specific identity, e.g. an account with a specific VoIP provider, should always be used for calls to a telephone number.
Note: If you want to use an identity specified in the telephone book for outgoing calls, you must dial the number from the telephone book. If you enter the number manually on the keypad, the phone uses the current outgoing identity at the time.
group #
The group types available are friends, family, work, colleagues. You can assign your own ringtone to each contact type.
Ringtones #
The phone has 10 built-in ring tones. It is also possible to download a customized ringtone.
Assigning ringtones to identities: See "Ringtones" on page 72.
Assign ringtones to the contact type VIP and the group types #
In the web interface, open Preferences> Phonebook Ringtones.
Select a ringtone from the respective pull-down menu and click on "Apply". If you have selected “Individual ringtone”, enter the URL of the file in the text field of “Individual ringtone URL”. It must be a file of the type "PCM 8 kHz 16 bit / sample (linear) mono WAV".
Note: Ring tones that you have assigned to the contact type VIP and group types have priority over the ring tones that are assigned to identities. Do you have
For example, bell 1 for an identity and bell 2 for the “colleagues” group, bell2 sounds when a call from a contact in the “colleagues” group is received for this identity.
Create / edit entries on the phone #
Create entry manually #
- Press
to open the phonebook.
Press on the navigation key to go directly to or use the up and down arrow keys /.
Press .
Enter the phone number and press.
In the Nickname window, enter a name (optional) and / or press.
Note: Entering a nickname is optional. If you do not enter a name, the entry will be made under the telephone number. You can add the name and other information later when editing the entry in the phone book or on the website.
After the message "Contact saved" you will find yourself in the phone book directory. Proceed as described below under "Editing entries".
Create a new entry from the call list #
Press to open the call logs.
- Press the number key of the list you want (missed, accepted, dialed).
Use / to select the call.
Press / "Details".
Press / “Save” to save the name - if the name has been transmitted - and
save the caller's number in the phonebook. If the name is not displayed, the number is also used instead.
Adding a name, phone type, group: see “Editing entries” on page 43.
Save the current caller #
Press to save the name - if the name was transmitted - and the number of the caller in the directory. If the name is not displayed, the number is also used instead.
Adding a name, phone type, group: see “Editing entries” on page 43.
Sort entries #
- Press
to open the phonebook.
Press .
Press / to select the sorting criteria (nickname, first name, last name, organization, etc.).
Edit entries #
- Press
to open the phonebook.
Select an entry: Use / to scroll through the entries or enter the first letter of the name.
Press . The “Details” screen is displayed.
- Edit detail.
Press / and to select a detail. Depending on the selected detail
In some cases a series of input windows will open. If required, change the data and / or press to save them and open the next input window. For information on entering text, see.
In other cases, a series of screen with selection buttons appears. Example: Change the settings of "Group".
Use and to select the “Group” setting. The "Favorite" window opens.
Use / and to select Yes or No. The "Group" window opens.
Use / and to select one of the settings “Family”, “Friend”, “Colleague”, “Work” or “None”. The "Contact type" window opens.
Use / and to select “VIP”, “block” or “none”. When you're done, press to return to the phonebook.
Delete Entry #
- Press
to open the phonebook.
Select an entry: Use / to scroll through the entries or enter the first letter of the name.
Note: If it is a name with more than one telephone number and you only want to delete one of them and not the entire entry, press
. Use / to select the number to be deleted and press the function key.
Press . The question: "Are you sure you want to delete?" Appears on the display.
If you really want to delete, press.
Create / edit entries on the web interface #
In the menu on the left, click on "Phonebook".
Create a new entry #
- Enter the data in the text fields of "Add or edit entry".
- Number: Enter the number exactly as it should be dialed, with country and area codes if necessary, and without brackets, hyphens, spaces, etc.
- Number type: Select the connection type from the pull-down list. The default setting is "SIP".
- Contact type: If you want to assign a contact type, select it from the pull-down menu. The default setting is “None”.
- Calls from a number on the VIP list are always announced on your phone, even if you are in a call or have "do not disturb" activated.
Note: You can assign a ringtone to the contact type "VIP": Preferences
> Phonebook ringtones.
- Calls from a number on the reject list will not be announced on your phone; the caller hears the busy signal.
- Outgoing identity: You will find all configured identities in the pull-down menu. If you assign one of these to a phone book entry as an outgoing identity, all calls to this number that you make from the phone book are made with the assigned outgoing identity.
- Blue field: The data in the text fields of the blue area is shown on the phone display when you open the entry in the phone. They can be edited on the phone and used to sort the entries by group, name, organization, etc.
- "Group": You can select the group "Friends", "Family", "Colleagues", or "Work" from the pull-down menu. The default setting is "none". You can assign a ringtone to each group: Preferences> Phonebook Ringtones.
- "Nickname": If you enter a name here, it will appear in the telephone book under the heading "Name".
- ◦ First name, last name: Are listed in this order in the telephone book under the heading "Name", unless you have also entered a nickname.
- Birthday. Uses the formats you have set in Preferences> General Information> US Date Format (mm / dd). Enter the dates in the format DD.MM.YEAR or MM / DD / YEAR. Examples:
| Output upon recruitmentUS date format (mm / dd) | |||
| date | input | At | Out |
| 05.03.1980 | 5.3.80 or 3/5/1980 | 3/5/80 | 5.3.80 |
| 12.03.1980 | 3/12/80 or 3/12/1980 | 3/12/80 | 12.3.80 |
| 05.10.1980 | 5.10.80 or 10/5/1980 | 10/5/80 | 5.10.80 |
| 12.10.1980 | 10/12/80 or 10/12/1980 | 10/12/80 | 12.10.80 |
- Favorite: Check the box to add the entry to the favorites list.
- Click on “Add / Edit” to save the entry in the telephone book.
to edit an entry #
When you open an existing entry, there are two additional buttons in the blue "Add or edit entry" field, "No. add ”and“ change ”, available.
- For an entry with a single phone number, click
in the line of the entry.
- For an entry with multiple phone numbers:
- click on
- click on
- click on
- For an entry with multiple phone numbers:
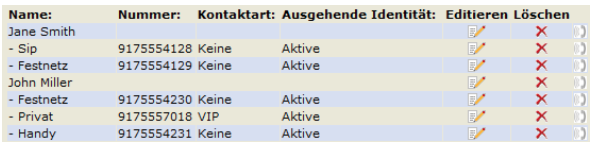
Make the desired changes / additions and click on "Change".
- Add another phone number (subentry) to a name.
- Jane Smith's entry has only one phone number, which is her SIP phone number. In this example, Jane Smith's landline number is added to the phone book.
- click on
- click on
- Jane Smith's entry has only one phone number, which is her SIP phone number. In this example, Jane Smith's landline number is added to the phone book.
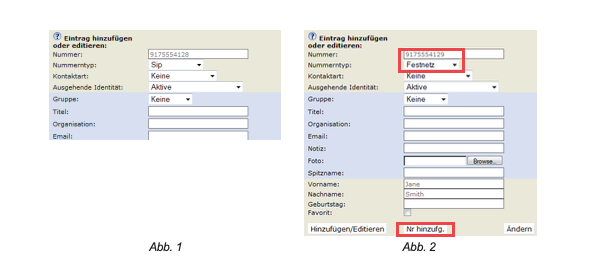
- Change the telephone number in the text field of "Number" (Fig. 2).
- Select “Fixed Line” from the “Number Type” pull-down menu (Fig. 2).
- If you want, select a contact type and an outgoing identity in the respective pull-down menu (Fig. 2).
- Click on “Add No.” (Fig. 2).
- John Miller's entry already has two associated phone numbers, a SIP number and a private number. In this example we add a mobile phone number as the third sub-entry.
- click on
on the line with John Miller's name. The data appear in the "Add or edit entry" field.
- Enter the phone number in the text field of "Number".
- Select “Cell Phone” from the “Number Type” pull-down menu.
- If you want, select a contact type and an outgoing identity from the respective pull-down menu.
- Click on “Add number”.
- click on
The phone book now contains Jane Smith's landline number and John Miller's cell phone number.
Delete entry on the web interface #
- For an entry with a single phone number, click
in the name line to delete the entry.
- Entries with multiple phone numbers:
- click on
- click on
- click on
in the line of a telephone number if you only want to delete this number but keep the rest of the entry (name and other numbers).
Select from the web interface #
click on in the line of the phone number to dial the number.
Delete the entire phone book #
Click this button to irretrievably delete the entire phone book!
Import / export phone book (CSV) #
See our website wiki at http://wiki.snom.com/Web_Interface/V7/Directory.
External telephone directories #
Provided by your network, your VoIP service provider, or some other external source.
LDAP #
Enter the access data received from your administrator, VoIP service provider or similar in the corresponding text fields on the phone's web interface> Advanced> Network> LDAP and click on "Apply" and "Save".
On the phone, enter the first letter of the name you are looking for. If the name shown isn't the one you're looking for, keep typing letters or scroll through the list. Press to dial.
contacts #
Open the web interface> Configuration identity (no.)> "SIP" tab. Click on the “To” radio button for “Contact list” and enter the URI that you received from your network administrator, VoIP provider or another external source into the text field of “Contact list URI” and click on "Apply" and "Save".
On the phone, enter the first letter of the name you are looking for. If the name shown isn't the one you're looking for, keep typing letters or scroll through the list. Press to dial.
The operation of the telephone #
These operating instructions describe the functions of the telephone with the default settings of the delivery status. If your phone was installed and / or set up by someone else, is
it is possible that the factory settings have been changed. Please contact the relevant person or company if your phone does not respond as described in these instructions.
The caller information shown on the display depends on the following setting: Phone's web interface> Preferences> General information> Number display style. There you can select one of these settings from the pull-down menu: full URL, name, number, name + number, number + name. The default setting is "Name".
A.call
Entering text, numbers and special characters: see "Entering text, numbers and special characters" Page 26.
Select the identity for the current outgoing call #
To configure identities / accounts, see “Identities (Accounts)” on page 70.
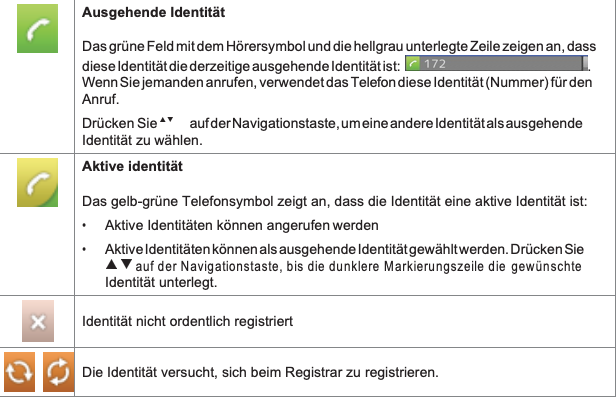
If you see more than one identity on the display, the one with the green receiver symbol and the line highlighted in light gray is the current outgoing identity
Press or on the navigation key to select a different outgoing identity.
Audio input and output devices #
Listener #
Pick up the handset, enter the phone number and press. OR
- Enter the phone number and pick up the handset.
Headset #
Enter the phone number and press or
. If you are using a Bluetooth headset, please also read Appendix 6 on page?.
hands-free device #
Enter the phone number and press .
Handset or headset and monitoring function via loudspeaker #
- Choose as indicated above for handset or headset.
Press the function key below to switch on the cabinet loudspeaker and allow other people in the room to listen in. Press the button below to turn off the cabinet speaker.
Use of different dialing methods #
Automatic dialing #
This function requires the previous setting on the page Advanced> Behavior> Telephone behavior> Automatic dialing. You can use the pull-down menu to set the phone to dial the number entered 2, 5, 10 or 15 seconds after the last digit has been entered.
The phone automatically dials the number shown on the display as soon as the set number of seconds has passed.
Re-elect #
Press to view the last 100 numbers dialed.
Press to dial the highlighted number or press / to highlight another number and then press.
Call number from call list (missed, received, dialed calls)
Press .
- Press the number key of the list you want to open the list.
Use / to select a telephone number.
Press to dial the highlighted number.
Call number from the phone book
- Press
.
Use / to select a name or enter the first letter of the name on the keyboard. Press to dial the highlighted number.
Speed dial #
Configuring speed dial numbers: See "Speed Dial" on page 82. Assign a function key with a speed dial number: See section "Programming the function keys", "Example 3 - Direct selection using the LED function key ”on page 68.
- Calling the speed dial number entered in the speed dial list:
- Enter the configured speed dial number (0-30) or the special character (# or *) on the alphanumeric keyboard.
Press to dial the number.
• Calling the speed dial number (direct dial number) on the function key: Press the function key.
Call the emergency number #
These phone numbers can be dialed even when the keypad is locked. They must be saved as emergency numbers on the web interface. The numbers 911, 112, 110, 999 and 19222 are preset. For the configuration of emergency numbers see “Emergency Numbers” on page
76.
Call emergency number:
If the keypad is unlocked: Enter the number and press.
- With the keypad locked: Enter the number. The phone will dial the number as soon as you have entered the last digit.
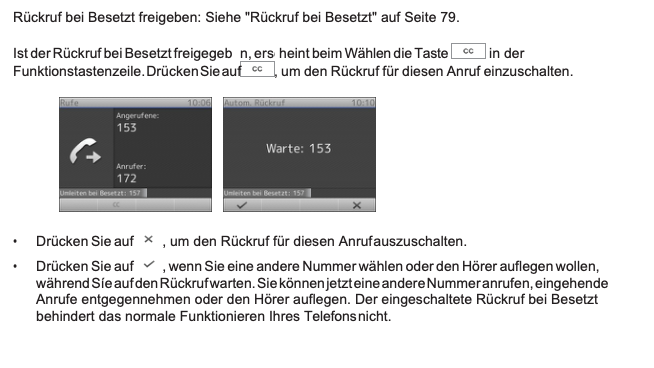
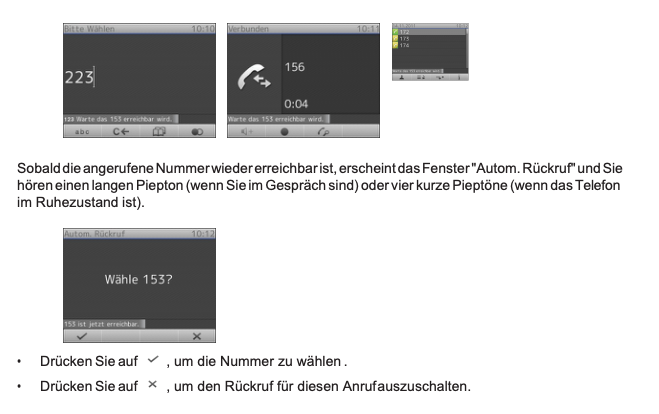
Callback when busy #
Note: This feature depends on whether or not it is available on your network. The meaning of this function in Snom telephones: If you have called a busy or unavailable number and have activated the function for the call, your telephone will call you back as soon as the number called is no longer busy or can be reached again. The default setting is "off".
Enable callback when busy: see “Callback on busy” on page 79.