


introduction #
This manual explains how to configure your voxGate or your hostedPBX. In order to ensure a smooth configuration, we recommend that you first collect all the necessary data and then follow these instructions.
Preparations #
Good preparation will make it much easier for you to set up your telephone system. Therefore, we recommend that you clarify the following points with the staff in advance. If the information of the following points is available, you can start with the configuration of the telephone system.
Create number plan/user list #
Each user on the telephone system has his own internal call number, this must be at least two digits long and must not begin with a 0.
If you use three-digit internal numbers, we recommend that you start with 200 because of the emergency numbers (112, 117, 118, 144). This way you remain flexible if you want to expand your system later.
When assigning passwords, pay attention to the security requirements:at least 8 digits
at least one small and capital letter at least one number
| 201 | 044 XXX XX 01 | 044 XXX XX 00 | Max pattern | Snom 720 | SUP, HRN |
| 202 | 044 XXX XX 02 | 044 XXX XX 00 | Fritz Muster | Gigaset C510 | HRN |
| 203 | 044 XXX XX 03 | 044 XXX XX 00 | Leo Mustermann | Yealink TG-46 | SUP |
| 204 | 044 XXX XX 04 | 044 XXX XX 00 | |||
| 205 | 044 XXX XX 05 | 044 XXX XX 00 | |||
| 206 | 044 XXX XX 06 | 044 XXX XX 00 | |||
| 207 | 044 XXX XX 07 | 044 XXX XX 00 | |||
| 208 | 044 XXX XX 08 | 044 XXX XX 00 | |||
| 209 | 044 XXX XX 09 | 044 XXX XX 00 | |||
| 210 | 044 XXX XX 10 | 044 XXX XX 00 | |||
| 211 | 044 XXX XX 11 | 044 XXX XX 00 |
Create flowchart #
With a flowchart you can record the desired flow of a telephone call even by a layman. Such a diagram facilitates the setup of the telephone system immensely.
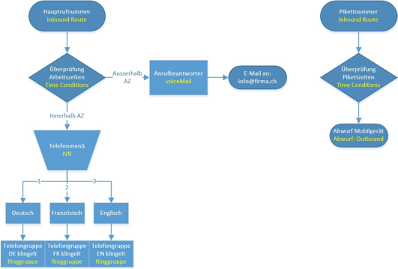
yellow = menu item voxManager
Capture participants #
The first step is to enter the subscribers on the telephone system. To do this, simply switch to Users and then click on "Add user".
We recommend only creating individual users at the beginning; the detailed settings for each user can be configured at the end.
Three fields are required here:
Extension: internal phone number
Password: password required for logging in and registering phones Name:extension name
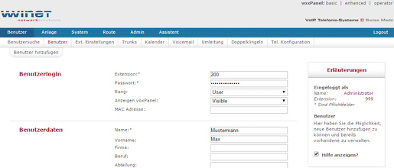
Don't forget to save the registered users at the bottom of the page!
Announcement texts #
Record/upload an announcement #
In order to record an announcement on the telephone, a system record must first be created. You can find this under System / Sound Files / System Recordings.
Once you have created a system record, you can manage it. You can either upload a file by clicking on "Select file" under Upload, or record a new announcement. To do this, enter your extension under "Record" so that you can then receive a call from the system.
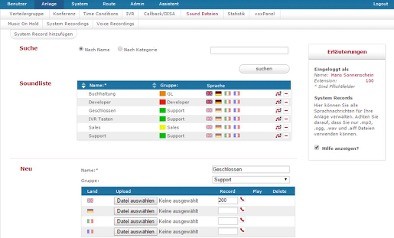
Now you can record and listen to the greeting on the telephone. If you are satisfied with it, you can save it by pressing the "9" key. To finally save it, it is important to click on "Save" again at the bottom of the attachment.
Enter ring groups #
Ring groups are used so that several telephones ring at the same time when a call is received. These groups are created under Plant / Distribution group.
Each group has its own internal phone number, so make sure when assigning them that you have enough space between the users' internal phone numbers and the groups. This way, complications can be avoided later when users are added.
If you create different groups with the same subscribers, we recommend setting a CID prefix. This will automatically be prefixed to the phone number when someone has called on this group. So in the example below, an incoming call would display HRN>0564704626. This way you know which number the caller has dialed before the call is answered.
Important: Make sure that a sufficiently long time is defined for the group timeout. As soon as the timeout is reached, the caller is dropped. If no drop is defined, the call is terminated!
Include users #
To add a user to a group, first click on the user icon:
Now you can simply move the desired users to the right side and save the configuration. External numbers (cell phones or similar) can be added in the separate tab.
calendar #
To route incoming calls to other destinations at certain times, there are Time Conditions, which can be found under System/Time conditions.
First create a calendar and define what should happen to the call if no times are defined. Often here is dropped to an answering machine (voiceMail).
The appointment settings for the call detour can be edited by clicking on them or on an empty area. Use the repeat function to define the normal business hours only once.
Define call number assignment (inbound routes) #
After the basic structure of the system has been configured, the telephone numbers are assigned. As soon as the numbers have been entered here, the system can be reached externally.
Three points are required here:
Surname
DID (phone number to be reached inbound, in national format) Destination (drop by: timeconditions/ringgroup)
Detail settings participants #
Finally, the detailed settings of the individual participants can be configured. Since all users already exist, you now have the option of applying the settings for all of them at the same time. To do this, click on the "Apply settings for others" button. Then select the items that are to be adjusted for several participants.
Participant internal/external #
internally #
Depending on the system, you have the option of connecting your telephones directly to your system via LAN, in which case the "Network Address Translation (NAT)" option must be deactivated.
For internal devices, the Plug'n'Play option can be used, which allows for easy setup.
external #
If the subscribers log on from an external network, the NAT option must be enabled to allow registration. This is the case, for example, with all hostedPBX'.
Define direct dialing/number display #
You can display a separate phone number for each individual user and define direct numbers. To do this, switch to "Trunks" for the user. The number displayed is entered in theCID field. The DID field stands for the direct dialing. No inbound routes are required for these direct dialing numbers!
Drops #
You can handle drops differently between internal and external callers. To do this, go to Ext. settings under the user.
In the example below, system internal calls are not diverted. If someone calls the user's direct dial and the call is not answered in 20 seconds, the caller ends up in the "Main number" ring group. If the subscriber is busy, the call is dropped to voiceMail.
Set up CID prefixes #
CID prefixes are a useful aid for identifying incoming calls. A prefix enables call detection before the call is answered.
Incoming #
With the example below, a call from "056 470 46 26" would be shown on the phone display like this: "HRN>0564704626". So one knows directly that the caller has called via the main number.
Prefixes can be set up under Route/Inbound for the respective inbound routes.
Outgoing #
You have the option of - pre-defined area codes - to display certain phone numbers. This is a particularly useful function for call centers, as the person called sees a local number from the area.
Global #
Under Route/Prefix CID you can enter the country and regional codes for areas where you have numbers. For the current country code, enter the area code for the country in which the telephone system is used.
user #
After the area codes have been entered under Route, you can define the other settings for each user individually. If the function is activated for a user, you can enter the phone numbers to be displayed in international format. The system will then automatically display the entered number when a call is made to such an area code.
Music on Hold #
You have the option of adapting your music on hold as you wish. You can ... a
.mp3 file to the system, which will then be played when a caller holds.Alternatively, you also have the option to add an online radio stream.
The Music on Hold settings can be found under System/Sound Files/Music on Hold.
Upload files #
To upload an .mp3 file, select the desired file using "Select file". Then click on save and wait until the file has been uploaded.
Legal #
Please note that you are not allowed to play any music title on your telephone system. In order for this to be permitted, fees are charged by SUISA depending on the title. For more detailed information on this topic, please contact SUISA directly:
Select Background Music / Music on Hold from the link above.
Add online radio #
To add an online radio, enter the link of the radio in the IP address field. To keep track of the different radios you can name the link.
Include files/radio #
After the desired files or music radios have been added to the system, they still need to be included so that they can be played.
The easiest way to do this is to edit the default group so that you do not have to make any adjustments to the user settings. To do this, click on the music icon in the default group. Now add the music/online radio to the group by clicking +.
Create IVR #
The IVR (Interactive Voice Response) module is used to create a telephone menu with various options. You can find this under Annex / IVR.
Once you have created an IVR, click the "Manage Actions" icon:.
Create submenus #
To create submenus click on the "+" icon on the left side. Give the menu a name at point two on the screenshot below. Then save it at point three.
Manage actions #
After an IVR has been created, it is now necessary to configure what should happen with the call. Below is an example of a selection option between different departments.
After the framework has been configured, the other submenu drops must be defined. To do this, click on the "+" symbol on the left side.
Legend #
playfile Plays a sound file
playfile_key Plays a sound file and waits for a one-digit input playfile_string Plays a sound file and waits for a multi-digit input rec_file Records the conversation
destination Definition of a drop target
goto_ivr Pass to another IVR/submenu get_key waits for the input of one digit get_string waits for a multi-digit input
loop Repeats the whole sequence
Backup #
To save the current configuration of the system, we recommend that you regularly create a backup. To do this, simply switch to System/Backup.
We recommend that you perform a backup before any planned change. If you need a previous system restore, you can restore a backup by clicking on the returning arrow icon. With the down arrow you can download the desired backup to your PC.If your backup takes a long time, you also have the option to save only the settings of the system (without call recordings, system announcements & voiceMail files).
Local backup #
A local backup of the system is set up by default. With these backups, you can restore your system to an old, functioning status if you have made a mistake during configuration. For security reasons we recommend to save the local backup on a computer, so that in case of a defect of the plant the settings can be transferred to another one.
FTP backup #
You also have the option to save a backup directly to an external FTP server. To do this, enter the required user data and the address of the server under FTP configuration. To check the configuration, there is an FTP connection test below. This tells you whether the system can save the backup on the entered path.
Provisioning Assistant #
The Provisioning Wizard helps you set up the phones and users on your PBX. It can be used to pre-configure the phones without removing the phones from their original packaging.
You can find the wizard under Wizard / Configuration:
Using the wizard #
Start the wizard by clicking on the button "Configuration Wizard >>". You will then see an overview of the users currently created in your telephone system.
Entering the MAC addresses #
If all users are already recorded, you can enter the MAC addresses of the phones for the respective users in the list.
You can find the MAC addresses on the packaging or the back of your phone.
Once the MAC addresses have been entered, you can define the settings for the phone by clicking on N / A under Configuration.
In the configuration you select the manufacturer of your telephone sets. Then you select the model, the firmware version and the configuration group. Finally, the customer number of myWinet is entered in the corresponding field.
If this has been saved, the phones and users are already completely prepared. As soon as you connect a telephone with a corresponding MAC address to an Internet connection, the appropriate configuration is automatically loaded. Plug in and start calling!
Support Winet Voicetec Solutions AG #
For support requests or technical assistance, our VoIP Engineers are at your disposal according to our service times
Service time #
Proactive manned operational support is available during working hours (AZ) on working days from Monday to Friday (excluding holidays) in the period from 08h00 to 12h00 and 13h30 to 17h00. During the other times (IP) the optional on-call service is available
Coordinates #
You can reach our Customer Service as follows:
- eMail customer.service@winet.ch (ticket opening)
- Private customers 0900 66 3932 (CHF 2.50/min)
- Business customers +41 56 520 20 00


